There's something truly magical about the aroma of freshly baked bread wafting through your home. And when it comes to comfort food, few things hit the spot quite like a warm, fluffy dinner roll, golden-brown and brushed with melted butter. The good news? You don't need to be a seasoned baker to achieve this culinary bliss. With just a few common pantry staples and a little love, you can whip up irresistible easy dinner rolls that will have everyone asking for more.
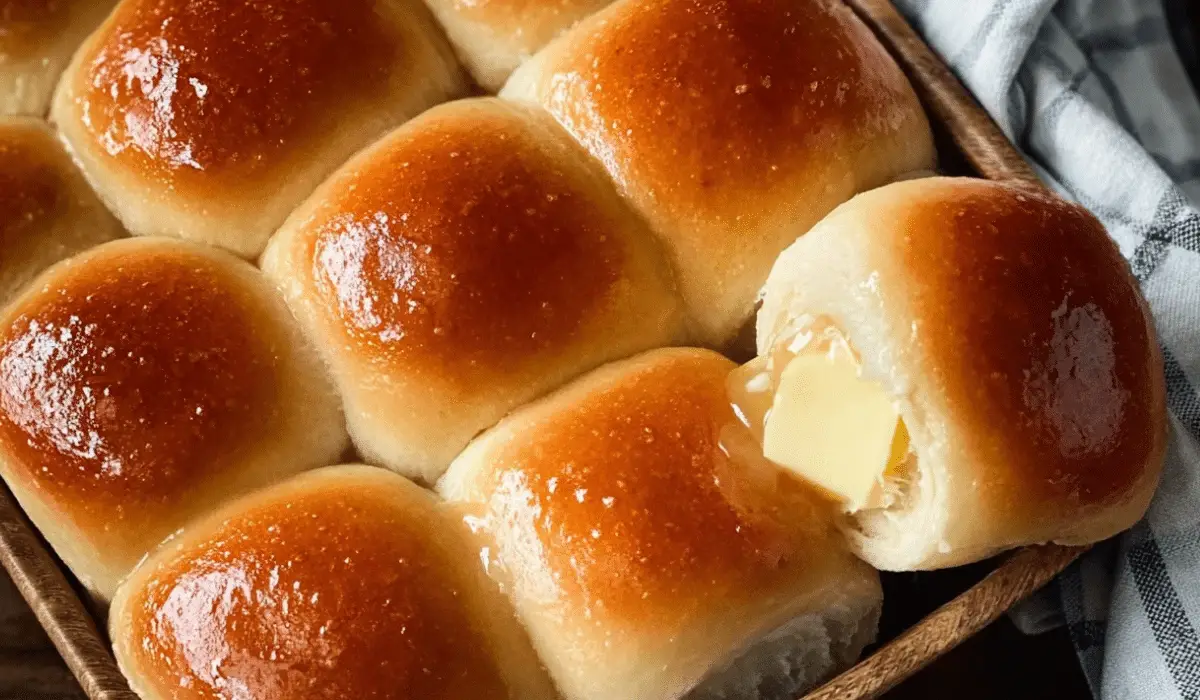
Forget store-bought rolls; homemade is a game-changer. These aren't just any rolls; they're the kind that are soft, buttery, and boast a subtle hint of sweetness, making them the perfect accompaniment to any meal, from a holiday feast to a simple weeknight dinner.
Why Homemade Dinner Rolls Are Always a Winner
The allure of homemade dinner rolls goes beyond just their incredible taste. It's about the experience, the satisfaction, and the warmth they bring to your table. Unlike their pre-packaged counterparts, these easy dinner rolls offer an unparalleled freshness and tenderness that simply can't be replicated. Imagine pulling a tray of these beauties straight from the oven, their crust a delicate golden hue, and their interior steaming with fluffy perfection. Each bite delivers a rich, buttery flavor with just the right amount of sweetness – a combination so delightful, it’s hard to resist grabbing a second, or even a third!
Making them yourself also gives you complete control over the ingredients, ensuring a wholesome and delicious product free from unnecessary additives. Plus, the process itself, from kneading the dough to watching it rise, can be incredibly therapeutic. Whether you're a beginner or an experienced baker, mastering these soft, melt-in-your-mouth rolls is a rewarding endeavor that promises smiles around the dinner table. They elevate any meal, turning an ordinary gathering into a memorable occasion, and demonstrating that sometimes, the simplest things are the most profound.
The Simple Ingredients Behind Irresistible Fluffiness
One of the best aspects of this recipe is that it relies on ingredients you likely already have in your kitchen. These fundamental components work in harmony to create the perfect texture and flavor for your easy dinner rolls.
- All-Purpose Flour: The foundation of any good bread, all-purpose flour provides the structure for your rolls. While you might be tempted to use bread flour, all-purpose is ideal here for achieving that wonderfully soft and tender crumb we're aiming for. Too much gluten can lead to a chewier roll, which isn't always what you want for a light dinner roll.
- Yeast (RapidRise or Active Dry): This is the magical leavening agent that gives your rolls their incredible rise and airy texture. We highly recommend using RapidRise yeast for its speed and convenience, allowing you to get those rolls on the table faster. If you opt for active dry yeast, simply follow the package directions for activation, which usually involves proofing it in warm liquid for a few minutes. Regardless of type, always double-check the expiration date! Expired yeast won't activate properly, leaving you with dense, flat rolls.
- Sugar: Just two tablespoons of sugar are all it takes to add a delicate hint of sweetness that perfectly balances the savory notes of the rolls. More importantly, sugar acts as food for the yeast, helping it to activate and produce those crucial air bubbles that make the rolls fluffy.
- Salt: Don't underestimate the power of salt! It's not just for flavor; salt plays a vital role in controlling the yeast's activity and strengthening the gluten structure in the dough, contributing to a better texture and overall taste.
- Warm Milk: This ingredient serves multiple purposes. First, the warmth helps to activate the yeast, getting it ready to work its magic. Second, milk adds moisture to the dough, ensuring a soft, tender crumb. Its fat content also contributes to the richness and flavor of the rolls, keeping them soft long after they’ve cooled. Ensure your milk is comfortably warm (around 105-115°F or 40-46°C) – too hot and it will kill the yeast; too cold and it won't activate it.
- Melted Butter: Butter is key to achieving that rich, buttery flavor and tender texture. It's incorporated into the dough and, crucially, brushed generously over the rolls immediately after baking, adding a beautiful sheen and an extra layer of irresistible taste. For best results, use unsalted butter to control the overall saltiness of your rolls.
Whipping Up Your Easy Dinner Rolls: A Step-by-Step Journey
Making these fluffy, buttery rolls is surprisingly straightforward, whether you prefer to knead by hand or let a stand mixer do the work. The process involves a few key stages that transform simple ingredients into a baked masterpiece.
- Activate the Yeast: In a large bowl or the bowl of your stand mixer, combine the warm milk, sugar, and yeast. Give it a gentle stir and let it sit for about 5-10 minutes. You should see a foamy layer form on top, indicating your yeast is alive and ready to work!
- Combine Dry Ingredients: While the yeast is activating, in a separate bowl, whisk together the flour and salt.
- Mix the Dough: Add the melted butter to the yeast mixture, then gradually incorporate the dry ingredients. Mix until a shaggy dough forms.
- Knead to Perfection: Turn the dough out onto a lightly floured surface and knead for about 5-7 minutes by hand, or use the dough hook attachment on your stand mixer for about 3-5 minutes on medium speed. The dough should become smooth, elastic, and spring back when lightly poked. Proper kneading is essential for developing the gluten, which gives the rolls their structure and chewiness.
- First Rise (Proofing): Lightly grease a clean bowl, place the dough in it, and turn it once to coat. Cover the bowl with plastic wrap or a clean kitchen towel and place it in a warm, draft-free spot. Let the dough rise for about 45-60 minutes, or until it has doubled in size.
- Shape the Rolls: Gently punch down the dough to release the air. Divide the dough into equal portions (typically 12-16, depending on desired size). Shape each portion into a smooth, round ball. You can do this by cupping the dough in your palm and rolling it against the counter in a circular motion. Arrange the shaped rolls in a greased baking dish, leaving a small space between each.
- Second Rise: Cover the baking dish again and let the rolls rise for another 20-30 minutes, or until they look puffy and nearly doubled in size. This second rise is crucial for achieving a super light and airy texture.
- Bake and Brush: Preheat your oven to 375°F (190°C). Bake the rolls for 12-18 minutes, or until they are beautifully golden brown on top. The exact timing can vary slightly depending on your oven, so keep an eye on them. As soon as you pull the rolls from the oven, brush them generously with additional melted butter. This adds shine, flavor, and contributes to their incredibly soft crust. While some recipes promise Quick 1-Hour Dinner Rolls: Soft, Buttery & Easy Recipe, focusing on specific techniques, even a slightly longer, traditional approach ensures consistent perfection with minimal fuss.
Beyond the Bake: Make-Ahead, Storage, and Reheating Secrets
One of the most practical advantages of these easy dinner rolls is their versatility when it comes to preparation and preservation. You absolutely can make them ahead of time, which is a lifesaver for busy weeknights or holiday meal planning, reducing stress and ensuring fresh rolls are always on hand.
Mastering Make-Ahead Rolls
You can prepare the dough, shape the rolls, and then halt the process before the second rise. Simply arrange the shaped dough balls in your greased baking dish, cover them tightly with plastic wrap, and refrigerate overnight (up to 24 hours). When you're ready to bake, remove the dish from the fridge and allow the rolls to come to room temperature for about 30-45 minutes. Then, let them proof for their second rise (another 30 minutes, or until doubled in size) before baking as directed. This method ensures warm, fresh rolls with minimal last-minute effort.
Storing Your Baked Dinner Rolls
Once completely cooled, store your leftover dinner rolls in an airtight container or a zip-top bag at room temperature for up to three days. For a slightly longer shelf life, you can refrigerate them for up to a week. While they'll still be delicious, refrigeration can sometimes alter the texture slightly.
Reheating for Freshness
To bring refrigerated or day-old rolls back to their warm, soft glory, you have a couple of options:
- Oven Method: Preheat your oven to 300°F (150°C). Place the rolls on a baking sheet, you can cover them loosely with foil to prevent drying, and warm for about 10 minutes, or until heated through.
- Microwave Method: For a quick reheat, place one or two rolls on a microwave-safe plate. Microwave for 15-20 seconds for a single roll, or 30-45 seconds for a few, until warmed through. Be careful not to overcook, as they can become tough.
Freezing for Future Feasts
Freezing is an excellent way to extend the life of your dinner rolls, whether baked or unbaked dough.
- Freezing Baked Rolls: Once the rolls are completely cooled, place them in a single layer on a baking sheet and freeze until solid. Transfer the frozen rolls to a freezer-safe zip-top bag, removing as much air as possible. They'll keep in the freezer for up to three months. To reheat, thaw them in the refrigerator overnight, then warm them in the oven as described above.
- Freezing Unbaked Dough: This is a fantastic option for truly fresh-baked convenience later. After shaping the dough into individual rolls (before the second rise), place them on a baking sheet lined with parchment paper and freeze them until solid (at least overnight). Once frozen, transfer the dough balls to a zip-top freezer bag and store for up to three months. When you're ready to bake, take the desired number of frozen dough balls out and place them on a greased baking sheet. Let them thaw and rise at room temperature for about 4-5 hours (this process will take longer than fresh dough). Once they've doubled in size, bake as directed. For an even deeper dive into making your rolls ahead of time and mastering freezer techniques, explore our comprehensive Master Make-Ahead Dinner Rolls: Freeze, Thaw & Reheat Guide.
Pro Tips for Perfect Rolls Every Time
- Measure Flour Correctly: Too much flour is a common culprit for dry, dense rolls. Scoop flour lightly into your measuring cup and level it off with a straight edge, rather than packing it down.
- Don't Over-Knead: While kneading is crucial, over-kneading can result in tough rolls. Stop when the dough is smooth and elastic.
- A Warm Place for Rising: Dough loves warmth! If your kitchen is cool, try placing the covered dough bowl in a slightly warm (but turned off) oven or near a sunny window.
- Even Shaping Matters: Try to make your rolls roughly the same size and shape so they bake evenly. A kitchen scale can be helpful here.
- Internal Temperature Check: For ultimate confidence, use an instant-read thermometer. Rolls are typically done when they reach an internal temperature of 200-210°F (93-99°C).
Baking homemade easy dinner rolls is more than just following a recipe; it's an experience that fills your home with comforting aromas and your table with pure delight. Using simple pantry staples, you can create fluffy, buttery, and utterly irresistible rolls that will be the star of any meal. Whether you're making them for a special occasion or just to elevate a weeknight dinner, these rolls are sure to impress. So go ahead, tie on that apron, and prepare to bake some magic. Your taste buds (and your family) will thank you!
